Friday, September 30, 2011

Bleu for you.

Blue cheese dressing. Iceberg and bacon optional. © Ryan Schierling

Ah, the classic iceberg lettuce wedge with blue cheese...

Cool. Crisp. Refreshing. A pungent cheese that speaks straight to the heart of a "stinky cheese" lover like me.

It's no secret I'm a huge fan of what Ryan calls "challenging cheeses." I'm pretty sure I come by it naturally, though. Big "shout out" to Mom and Dad, here, because unlike most American kids of my generation who were brought up eating Ranch dressing on every-freaking-thing, I grew up eating a lot of blue cheese. By this I mean it was the salad dressing of choice in our family. At restaurants it was always "four salads with blue cheese, please."

That simplicity quite possibly made up for some of our more ambitious meat-substitution requests when dining out. At home it was always either blue cheese or Roquefort, a blue cheese of a slightly different color, you know... for variety. About the only way I remember eating Ranch was as an occasional dip for raw vegetables. Even then I didn't get the appeal, and Thousand Island just seemed like a visit to the dark side.

Looking back, it's actually a little surprising that we never made blue cheese dressing from scratch when I was growing up. Granted, we were pretty picky about the brands we chose (the best supermarket varieties are in jars in the produce section) and there are plenty of bad blue cheese dressings out there. So, I very much appreciate the serendipity of having this wonderful recipe grace my repertoire via Steven, my fabulous father-in-law-in-a-former-life. I asked him, recently, how he had come upon it and this is the story he related.

Monday, September 19, 2011

Cousin Larry's smoked salmon dip.

Smoked salmon dip w/ homemade crackers. © Ryan Schierling
Julie and I have different stories for how we obtained this recipe. She swears we reverse-engineered it straight from the Larry's Market ingredient list on the side of the plastic to-go container. I swear we begged for it from the fishmonger at Larry's Market in Seattle before the chain was bought out under Chapter 11 bankruptcy protection, afraid that our favorite in-house-made smoked salmon dip would never be seen on their refrigerated shelves again.

It's been years and years that we've been making this dip, and the scrawled notes on a loose piece of 8 1/2" by 11" paper tucked into our overstuffed recipe binder hold no further clues to its origins, so I'm going to side with my (perhaps misplaced) nostalgia and simply attribute it to cousin Larry from Seattle.

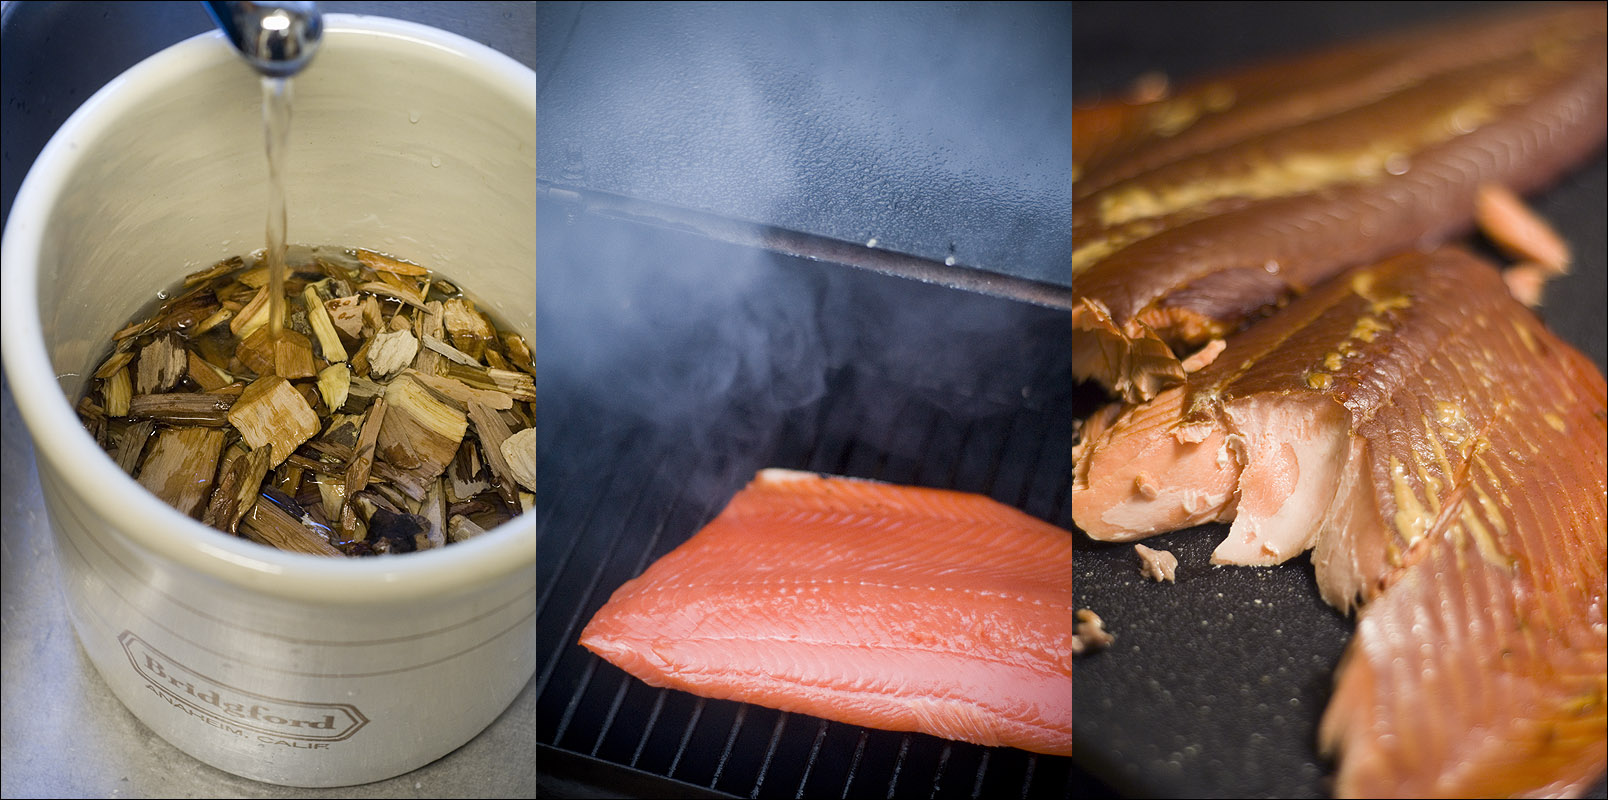
Get yourself a nice piece of fresh Alaskan salmon. Our local grocer was laying out sides of never-frozen Alaskan coho (silver) salmon, and that was all it took for me to get on the phone and tell J to start making crackers. Find yourself some chunks/chips of apple wood.

Remove pin-bones with a pair of tweezers and brine that fish in a 50/50 mixture of kosher salt and brown sugar dissolved in a couple gallons of water, for about eight hours. Rinse, pat dry, and let sit out at room temperature for 3-4 hours, periodically making sure your cats have not expressed an interest in the fish. This drying time ensures a nice tacky pellicle will have formed, allowing the wood smoke to really adhere to the salmon and keep moisture in while the fish is kippering on the grill or smoker.

Soak a few good handfuls of apple wood in water for half an hour. Set aside a few good handfuls of dry apple wood. If using a kettle grill, set up the coals for indirect grilling – coals on one side, and a disposable aluminum pan filled with a few inches of water on the other. Ideally, your grill or smoker will be between 150- and 190-degrees. If it's hotter, that's fine, but this isn't a race... you're just going to have to keep a closer eye on the internal temperature of your fish.

Place the wet and dry apple wood on your coals. Here comes the smoke. When using a kettle grill, I open the bottom vent and close the top. When using an offset barrel smoker, I close the top vent and adjust the firebox vent according to my smoker temperature. Kipper the salmon, thick part of the filet toward the firebox, until it reaches an internal temperature of 130-degrees in the thickest part of the filet. Remove and let cool.

I gotta go water the wood. © Ryan Schierling
Or, save yourself 12 hours, spend four times as much and get a 4 oz. piece of pre-packaged, already-smoked salmon. It's up to you, and this isn't a recipe for smoked salmon... really, it's a recipe for smoked salmon dip. So, uhm, here it is... straight from the archives.


Salmon Dip (like Larry's Market)

8 oz. cream cheese, softened
1/4 cup real mayonnaise 
1/2 teaspoon Tabasco sauce
4 oz. hot-smoked (kippered) salmon
4 tablespoons green onion, finely chopped

Mix first three ingredients together in stand mixer, with whisk attachment, until light and fluffy. Crumble in the smoked salmon (check well for bones) and add green onions. Mix until evenly incorporated. If desired, add additional Tabasco at this point, to taste (we use closer to 1 teaspoon). Serve with your cracker of choice. 

Sunday, September 11, 2011

Orzo and the art of recipe sourcing.

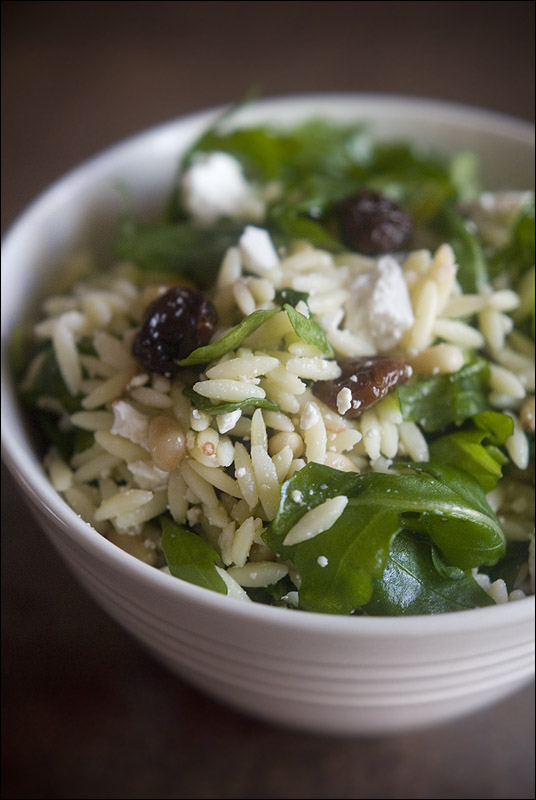
Tri-Colore Orzo, revealed. © Ryan Schierling
Attribution. Have you ever wondered where that old family recipe actually came from? Curious if it is truly some anomaly of creative deliciousness, or if it actually made it into the family recipe box via a neighbor at a potluck who never mentioned that they got it from a recipe book or magazine? Even more curious, what might that original recipe have instructed? Were changes made from the original?

Peruse the comments and ratings on any online recipe site and it's clear that even on the first try somebody will inevitably substitute an ingredient or two, easily half the time. I always find this a bit disconcerting. Not that the person showed originality, used what they had on hand and made it their own – no, that is quite the point of the creative process in the kitchen most days. What is strange sometimes is that in the process they may have entirely missed the point of the flavor combination that makes the recipe the sparkly star it is reported to be in the first place. Sometimes I think a recipe really deserves to be tried and tasted as instructed and judged on its intended merits.

It is easy to understand, though, how the original attribution can get lost in time. A good basic recipe becomes a "foundation recipe" spawning a multitude of variations and interpretations. Sometimes, though, a recipe is golden just exactly as written.

What got me thinking about this? A wonderful orzo pasta salad recipe by chef Giada De Laurentiis. It became a favorite at our house after a gathering a few years ago at the home of our friends Megan and Ross. I haven't had the honor of eating Megan's cooking nearly often enough, but from what I know she is an adventurous cook with a discerning eye for all things tasty. It's not just an uncanny knack for finding a good recipe, either, I actually think there is a gift to executing a new recipe, as well. It requires taking "season to taste" to heart and a certain confidence in the fundamentals.

But I digress... after about my third helping of this salad, I had to ask Megan for the recipe. She told me it was a Giada De Laurentiis recipe called Tri-Colore Orzo and I could look it up online. Here's where I have to give a real hand to both of these fine ladies. Giada for creating a salad that is easy, beautiful and awesome – and Megan for making this salad as the recipe instructed with no substitutions or fiddly exceptions. Straight up delicious.

Now, this is one salad that won't win any awards for being budget conscious – it adds up when you're out buying baby arugula, sweet dried cherries and pine nuts – but it is totally worth it. It's a wonderful mouthful of sweet fruit and spicy greens and salty ricotta salata all dressed in extra virgin olive oil and fresh lemon juice.

I still make this per the recipe. I'm a little loose with the measurements, but a few more pine nuts or an extra handful of arugula really won't change the overall flavor profile. The one and only time I made a major change was for a friend with a wheat allergy who couldn't eat pasta. In that case I substituted cooked long-grain white rice for the orzo pasta for a dish that was just as pretty and equally flavorful.

One of the best discoveries about this salad is that it also keeps exceptionally well in the fridge. With a tipple of olive oil to freshen it up in the morning, it makes a charming lunch item that will keep your taste buds bustling with happiness all week long.


Tri-Colore Orzo
(Giada De Laurentiis, Everyday Italian – via Foodnetwork.com)

1 pound orzo pasta
3 tablespoons extra-virgin olive oil, plus 1/4 cup
2 cups fresh arugula (about 3 ounces)
3/4 cup crumbled ricotta salata cheese (or feta cheese)
1/2 cup dried cherries
12 fresh basil leaves, torn
1/4 cup toasted pine nuts
3 tablespoons lemon juice
1 1/2 teaspoon salt
1 teaspoon freshly ground black pepper

Bring a large pot of salted water to a boil over high heat. Add the pasta and cook until tender but still firm to the bite, stirring occasionally, about 8 to 10 minutes. Drain pasta and put the pasta on a large cookie sheet. Drizzle the pasta with 3 tablespoons olive oil, toss, spread out, and set aside to cool.

Once the orzo is cool, transfer to a large serving bowl. Add the remaining ingredients and toss gently to combine. Serve.


(Now, of course, I am curious.... what was Giada's inspiration?)


Monday, September 5, 2011

Our batch of Hatch.

(L) Roasting Hatch chiles on the Weber. (R) Simmering salsa verde. © Ryan Schierling
The allure of Hatch chiles is not lost on me. Living in the northwest, they were impossible to find. When the annual Hatch Chile Festival was going on in Hatch, New Mexico at the beginning of September, these bad-ass cousins of the mild-mannered Anaheim chile were spreading across the south like a green heat wave. But the only way to get them in Washington state was to order them at considerable expense from one of the many Hatch purveyors online.

Here in Austin, you start seeing crates of them in grocery stores around the middle of August, with nary a pepper left by Labor Day. It's a fairly narrow window of opportunity, and you can bet we weren't going to miss it.

Really, you can't afford to miss it. A pound of fresh Hatch chiles was, at it's most expensive this year, $1.29, and we eventually got them at three pounds for a dollar. We spent a few days fire-roasting, peeling, cooking, canning and freezer-bagging our bounty of Hatch chiles, and there's a part of me that still doesn't think we have enough.

Since we're new to using Hatch peppers, a proper New Mexico salsa verde from Green Chile Bible - Award-winning New Mexico Recipes was first on the list. An easy green sauce – chopped chiles, onion, garlic, chicken stock, cumin and a bit of salt – that is simply simmered and served. It can be added to anything, spooned on top of everything, and lends an earthy heat that is more complex than most other chile peppers.

We rolled whole-roasted chiles with cheese and chunks of fresh white onion into corn tortillas for Hatch enchiladas in red sauce. Julie made her famous ghetto mac-n-cheese with fusilli and smoked cheddar cheese, and we added Hatch salsa verde until it was a creamy light green and brought a sweat to your brow after a few bites. New Mexico chile verde is the green equivalent of Texas red, and it worked very well for breakfast on top of hash browns with diced onion, sour cream and a couple of over-easy eggs.

Though it won't last until next season, our batch of Hatch will definitely inspire more dishes over the next few months and provide a little bit of internal warmth this winter when Austin temperatures drop into… oh, say… the bitter-cold mid-50s. 


(L-R) Hatch chile and cheese enchiladas in red sauce. Hatch mac-n-cheese with smoked cheddar. Hatch chile verde over hash browns with over-easy eggs. © Ryan Schierling

Friday, August 26, 2011

Cold comfort.

Thai curry salad, three ways. © Ryan Schierling
The salad days of summer are here, and it's been a lengthy and hot season this go around. This week, in fact, Austin broke a record for consecutive days over 100º F – seventy days straight – beating the old record set in 1925.  So what do you do when you are suffering through Thai curry withdrawals and it's just too bloody hot outside to eat it the traditional way?

Well, we made salad.

Oh, but we didn't just make one kind. No, we had to try three different kinds... 

It's been a month turbocharged with ideas, but we seem to have suffered from insufficient time for setting all those creative impulses into motion. So, when we committed to making salads Thai curry-style, we didn't mess around; we just made them all. The red, green and yellow standards that are familiar in our home, just a little... cooler.

I tend to associate "comfort food" with hot food. Something that warms the belly and coddles the senses, and this was admittedly a wide swing in the opposite direction of my huge crush on the hot, hot deliciousness that is Thai curry. But, no matter! Sometimes one's source of inspiration gets tantalizingly trumped by curiosity and an inventive tangent.

Now, we stayed as true to the traditional elements used in each of these curries when served hot, but adapted as necessary for the freshness and texture we expect of a salad. In lieu of jasmine rice we used a delicate rice vermicelli. We decided to limit it to three basic ingredients in addition to the vermicelli, a traditional curry sauce and the amazing fresh Thai basil we are blessed to have happily at hand in our herb garden. Our other criteria was that each salad had to have something with a little crunch and be able to feature a starch or protein nicely. We chose vegetables that are as good fresh as cooked, and passed on the tofu – just this once. (Curry and tofu are most excellent companions, though, so we will totally try this with fried tofu one day soon.)

Sunday, August 21, 2011

TGICFS.

CFS w/ eggs and potatoes @ Dart Bowl. © Ryan Schierling
I learned a few things this Sunday.

I learned that the chicken-fried steak and eggs at Dart Bowl runs an anemic, distant third place to the blue-ribbon Tex-Mex cheese enchiladas (topped with proper chili-gravy and over-easy eggs) they are wildly famous for. Runner-up goes to the basket of homemade Texas toast with tiny paper condiment cups of butter already flipped over upside-down and melting onto the toast. Bringing up the rear sadly, a scrawny, wheezing, flat-footed CFS.

I learned that Julie didn't know the bowling terminology "turkey," where someone bowls three strikes in a row and a round of Wild Turkey shots is purchased. Even if it's only 11 a.m.

I learned that drinking Wild Turkey in the morning is even less glamorous when the 1 oz. shot is served in an 8 oz. plastic cup, but that $2.25 cans of Pearl are a dandy chaser.

I learned that I can throw a 14-pound bowling ball 23.62 miles-per-hour down the lane.

Thursday, August 11, 2011

Hey François, look what I done to your 'taters!

Potato pavé w/ bison Texas red chili and smoked cheddar. © Ryan Schierling
On a preparation scale of one to ten, a baked potato is... a one. You bake the whole potato. On that same scale of one to ten, potato pavé is a ten. It is French fussy, and requires uniformity and a strict adherence to procedure. It is most famously a Thomas Keller recipe from the wildly-popular Ad Hoc at Home cookbook.

Just about every food blogger worth their fleur de sel has already proudly pooped out a proper potato pavé post, per the recipe, and I'm sure they were delicious – but it's all just a little repetitious. It is an exceptionally visually-pleasing dish, spare in its ingredients and simple in its presentation. But I felt like there was more that could be done with these fancy 'taters, something a little more grandiose, something a little more Texan.

So once the pavé was baked, cooled and pressed, I sauteed the cuts in jalapeño-infused olive oil and topped them with a bison Texas red chili, Tillamook smoked cheddar cheese, and a toss of garlic chives. Sometimes you just shouldn't leave well enough alone – you might end up with a dish that is stupides américains, but above and beyond what it was ever intended to be.


Potato pavé

1 cup heavy cream
Coarse salt and freshly ground black pepper
3 pounds russet potatoes (three 1-pound potatoes if possible)
5 tablespoons unsalted butter, 1 tablespoon softened and 4 tablespoons cut into 1/2-inch cubes
Olive oil

(These are just the ingredients for potato pavé. Googly instructions for potato pavé are all over the internet. Everywhere. There are videos, some of which may include both Thomas Keller and Martha Stewart. I am not reinventing wheels here, I am only showing you how to the rock the ridiculous deuce-deuce chrome ones. See every other food blogger for how to assemble proper potato pavé. Just be aware that it takes about two days since you're baking, then compressing the brick of potatoes in the refrigerator. Might as well start your long-simmering chili to go with it.)


Potato brick. © Ryan Schierling


Bison Texas Red

1 pound ground bison
1 1/2 pounds bison steak, cut into 1/2" pieces
1 whole white onion, diced
6 large jalapeño peppers, seeded and diced
3 dried ancho chiles, soaked in water until tender, seeded and pureed with 1 cup of the soaking water
1/2 cup black coffee
1/8 cup ground piloncillo or brown sugar
3 tablespoons chile powder
2 tablespoons kosher salt
1 tablespoon cumin
1 tablespoon Mexican oregano
1 tablespoon cinnamon
juice of 1 lime

Soak three dried ancho chiles in water until they are pliable, like delicious soft leather gloves. Remove the stems and seeds and put the chiles into a blender or food processor, adding one cup of the soaking water. Puree.

In a cast iron dutch oven or heavy soup pot, grey the bison steak chunks in a bit of vegetable oil over medium heat, or if you're feeling really randy, use a bit of beef suet. Add the ground bison, the onion and jalapeño peppers and cook until the ground bison is no longer red. Add the ancho chile puree, the black coffee and the piloncillo or brown sugar. Stir well, then adjust the liquid level if needed - if it's too thick, add a bit of water or beer. If it's too thin, don't worry, it'll reduce. Add the salt and rest of the spices. Cover and simmer over low heat for... a long while. About eight hours.

Check every half-hour or so to stir and make sure the consistency is good. If too thick, add a splash of that beer you're sucking on. If too thin, well, it's really never too thin after hours of cooking. Taste it every once in a while, adjust salt if needed. When the chunks of bison steak are finally falling apart, you're ready to add the juice of one lime, and start prepping your pavé.

Per that perfect pavé recipe you found, pull it out of the pan and square the edges off with a knife. Slice it into however many servings you're looking for (I did eight servings from a roughly 10 1/2" by 5 1/2" bread pan), and heat up some oil in a large skillet over medium-high heat.  Saute the pavé blocks on all four cut sides, until browned and just a bit crispy, then remove to a rack with a couple paper towels on it. Plate pavé, top with chili, garnish with slices of smoked cheddar and finely-chopped chives.

Related Posts Plugin for WordPress, Blogger...